Tuesday, March 27, 2012

Toddler Backpack: Garbage Truck for Alex's Son

Toddler Backpack
This toddler backpack was made for Alex's son "J".  He liked the Garbage Truck bag (what little kid wouldn't, right?).   Alex wanted a more clean look for her son's bag, hence, no pockets, no buttons, or extra colours.  Simple look and clean lines.  Here are some pictures... side views, top, quilted bottom, real backpack connectors to allow for easy adjusting, and hippo lining of course!

Baby Bunny likes to model so he agreed to put on the backpack just to check for the fit. 


If you were reading last month, you would have seen that I made a Dump Truck for Shannon's son.   Recently, she linked up a really cute video on my Facebook Page (click on photos and then scroll to the bottom for photos and videos).  Her adorable son was running around wearing his little backpack.  Take a peek - he's a cutie!

Next up, I need to finish this backpack... (and then a new one for Joshie and then one for Baby Bunny).


Note:  I create and sell toddler backpacks through my Josh & Teo ETSY Shop.  However, if you know how to sew and would like to tackle this project, visit Made by Rae's website to purchase a PDF copy of the pattern.  


 Happy Sewing!

Wednesday, March 21, 2012

My Downtown Adventure

Yesterday started off like any other day.   The kids and I did lots of stuff... we tinkered around on the piano (Elmo's Song about 30 times), played hide and seek, made another cardboard train (this time Henry), and they ran around wearing their super hero capes.

We also made and ate yogurt pops using pudding, raspberry apple sauce, and strawberry yogurt.  Le yum!


However, at 2:45pm, I said "goodbye kids" and "hello Go Train!".    My downtown adventure was to go shopping at King Textiles with Michelle from Thunderpeep Designs.  Michelle makes lovely cards and other things which she sells in her ETSY shop.  These are the cards that I got.  So nice!  She also put in some extra goodies in my loot bag.  I love paper.  Thank you Michelle!


I took a bunch of pictures of construction sites for Joshie.  This was by far, my favourite picture.  Love the orange...


This measuring tape was painted into the sidewalk near the fabric shop.

What a beautiful day!   So why no pictures of fabric?   I didn't actually get any (pat myself on the back for exercising self control).   I wasn't inspired so it ended up being just a nice day, having a nice chat with a new friend, and dinner with my cousin.  

Oh, and I came home to kids who missed me.  Aww... I should go out more often!

Tuesday, March 20, 2012

Recipe: Lime Chiffon Pie


Spring is in the air!  I love spring... fresh air, chirpy birds, and no more winter jackets!  It also means lighter tasting desserts.   One of my favourite spring/summer desserts is Lime Chiffon Pie.  I found this recipe for a lime chiffon pie a couple of years ago on the Kraft Canada website and I still love it.   I modified the recipe by adding the zest and juice of 1 whole lime.

I made the pie yesterday when the kids were sleeping.   Thank you kids!

Ingredients
2/3 cup boiling water
1 pkg. (0.3 oz.) JELL-O Lime Flavor Sugar Free Gelatin
Ice cubes
1/2 cup cold water
2 cups thawed COOL WHIP FREE Whipped Topping
lime zest from 1 lime
lime juice from 1 lime
1 ready-to-use reduced-fat graham cracker crumb crust (6 oz.) or a tart shell

Directions:
ADD boiling water to gelatin mix in large bowl; stir with whisk 2 min. until completely dissolved. Add enough ice to cold water to measure 1 cup. Add to gelatin; stir until ice is melted.
STIR in COOL WHIP, zest and juice. Refrigerate 15 to 20 min. or until mixture is very thick and will mound. Spoon into crust.
REFRIGERATE 4 hours or until firm.


This is what it looks like when you pour it into the pie shell.  It looks exactly the same after its been refrigerated.


Happy Eating!

Friday, March 16, 2012

Day 5 of Cardboard: Banker Box Oven and Refrigerator


Welcome to Day 5 of Cardboard Crafts! It's also the last day of March Break.  The weather has been so nice out so we've been out and about every day.  This is the last cardboard craft of the series and I hope you've enjoyed it!

Today we are going to take 2 plain brown banker boxes (like this one) and turn them into ovens and refrigerators.

 
These are so easy to make and kids can help too! The best part about this craft for parents is that you can put most of this back into the recycling bin once the kiddies are tired of playing with it.

Skill level: Easy!

Time: 10-15 minutes

Tools Required: 2 Bankers boxes, X-acto knife, ruler, pencil, printer, tape, glue

Cardboard Refrigerator:

  1. Place the bankers box onto its side so the door opens to the left or to the right.
  2. To make a "freezer" door and a "fridge" door, cut the lid in half horizontally.
  3. Inside the box, glue on some painting stir sticks or popsicle sticks in the middle of the box on all 3 sides.  This will be the bracket for the inner shelf.
  4. Take a piece of cardboard and place in the box on top of the brackets.  Now you have a shelf for your freezer
  5. Add handles to the door if desired
  6. Glue a magnetic sheet to the door and add some fun magnets
  7. Get some play food and put it inside!
Cardboard Oven:

  1.  Head over to Martha Stewart's website for the complete tutorial on How to Make a Cardboard Box Oven.  
  2. Once you take a look at the tutorial, don't copy it exactly.  Let the kids help you decide so that it's unique.   
Have fun making these with your kids! 

Thursday, March 15, 2012

Day 4 of Cardboard: Train

We're on Day 4 of Cardboard and guess what? We still love cardboard!

Today we are going to spend less than 5 minutes to make a Thomas.   I'm convinced that all little boys and girls love Thomas the Tank Engine.  Is it the TV show or perhaps that every Chapters/Indigo store has a huge train table?

Skill level:  Easy!
Time:  5 minutes
Tools Required:  Diaper box, Clear Tape, Marker, Paper

  1. Turn the diaper box inside out so that the printed words are now on the inside and the clean cardboard is on the outside.
  2. Re-tape the box to secure it
  3. Cut a piece of paper large enough to fit the front of the box
  4. Draw a Thomas the Train face onto the paper.
  5. Put happy toddler into the box or use it to hold toys
  6. Choo choo!
Come back tomorrow for my last post about Cardboard!

Wednesday, March 14, 2012

Day 3 of Cardboard: Vending Machine


Have you ever tried explaining to your children why it's so much better to buy something from the grocery store vs vending machine?  "You could buy 5 of these if we bought it from the grocery store!"  Doesn't matter what you say, there's something about putting a coin in a tiny slot, picking your item, and having that item fall down into your waiting hands.  

Today we are making a vending machine out of cardboard.  This project was made by hubby with Joshie's input.

Skill level:  Easy!
Time:  15 minutes
Tools Required:  Diaper box, Clear Tape, Marker, X-acto knife, Imagination

This is one of the easiest projects to do but it is great for creative play.
Here are the steps but feel free to improvise:
  1. Use a cardboard box that doesn't have text printed on it.  I picked this one up at the grocery store.  It used to hold pasta.  You could also use a diaper box, cut it open, flip it around, and re-tape it.
  2. Use an X-Acto knife to design a) the coin slot  b) the swinging door c) the coin return
  3. Hubby inserted a tube inside the box so that the coin would roll down from the coin slot and exit from the back of the box.  He put a little flap on the coin return so that coins wouldn't be flying out of the box.
  4. Once you have completed the coin slot, swinging door flap, and coin return, tape the box closed.
  5. Now it's time for some Sharpie fun.  You'll need to draw your number pad, as well as the items that are going to be for sale.  Notice how we have some items thare are not food?  The sun, heart, baby, and boot were Joshie's choices.
You're finished!  Now it's time to play and learn at the same time.  
 Here's what we taught Joshie with this vending machine: 
  1. Number Recognition
  2. Order/Sequencing  - i.e.  first you put in the coin, then you push the buttons, then you get the food
  3. Sharing
  4. Creativity - Joshie started putting his pretend play food into the swinging door so that he would "get" something once he put his money into the coin slot
  5. Counting - A bag of chips would cost 1 coin, while the boot would cost 2 coins
We get a lot of use out of this box and the kids love it.  Thanks hubby!
I hope you enjoyed reading about this craft... come back tomorrow for Day 4 of Cardboard!

Tuesday, March 13, 2012

Day 2 of Cardboard: Canada Post Play Mailbox

Welcome to Day 2 of Cardboard Crafts!  It's also Day 2 of March Break!

Today we are going to make a Canada Post Mailbox from a diaper box.  


Hubby and I love making things with cardboard.  We have way too many unused diaper boxes so when I asked him to make the kids a mailbox, he got on it right away.  This is what it looked like when he was done. The kids were thrilled.


This is what it looked like when I got my hands on it. I covered it with red poster board and taped it all over.   I let the kids play with it for a while but I felt like it needed a little something more.

I glued a picture of the Canada Post logo to the sides of the box.  I found the picture on google, enlarged it, and cut it out.  Now it looks like a Canada Post mailbox!!

The front opens up just like a mailbox and the back has a flap which allows us to take out what they put in. At first, it was just paper going in.  By the end of the week, we found lego, bowling pins, and a football.


So... how does this mailbox stack up against the real thing?  Well... we don't have to wait in line.

 Seems like our mail gets delivered quicker too! 

I hope you enjoyed this craft.  Come back tomorrow for Day 3 of Cardboard!


Linked Here:


Monday, March 12, 2012

Day 1 of Cardboard: Milk and Juice Boxes


This week is March Break..  a week when the kiddies are out of school and the malls and museums are jam packed.  I don't have to worry about that yet since none of my kids are in school, but we are definitely going to take it easy this week.   In honour of March Break, I am going to be posting 1 cardboard craft a day. 

Today we are going to make cardboard milk and juices boxes.  These are so easy to make and so much stronger than the play sets that we bought from Toys R Us.   Joshie and Bunny have so much imagination and they loved helping me make it.  

Skill level:  Easy!
Time:  10-15 minutes
Tools Required:  Old cereal box, X-acto knife, ruler, pencil, printer, tape, glue

First, head over to Mirkwood Designs to download a free template.  I used the template called "Milk Carton Box".    I found the current template to be too small so I enlarged mine before printing it out.   If you are using a cereal box, make sure you trace and score the template on the outside of the box so that when you fold the box, the brown cardboard becomes the outside.  Hope that makes sense!   (If not, head over here and take a peek at how I built a puffy box out of cardboard.)

I wrote the words O.J. and Milk onto the cardboard but you can decorate it any way you want.  Joshie coloured it with crayons and then I used packing tape to keep the crayon from rubbing off.  I also used some duct tape at the top because I didn't have any glue left in my glue gun.  All in all, this was a very easy project!

How about some OJ with your breakfast?


Or some chocolate milk with your snack?


Have fun making these with your kids!  Come back tomorrow for Day 2 of Cardboard!


Linking Up to These Fun Places:


Skip To My Lou

Friday, March 09, 2012

Just Hanging Out...

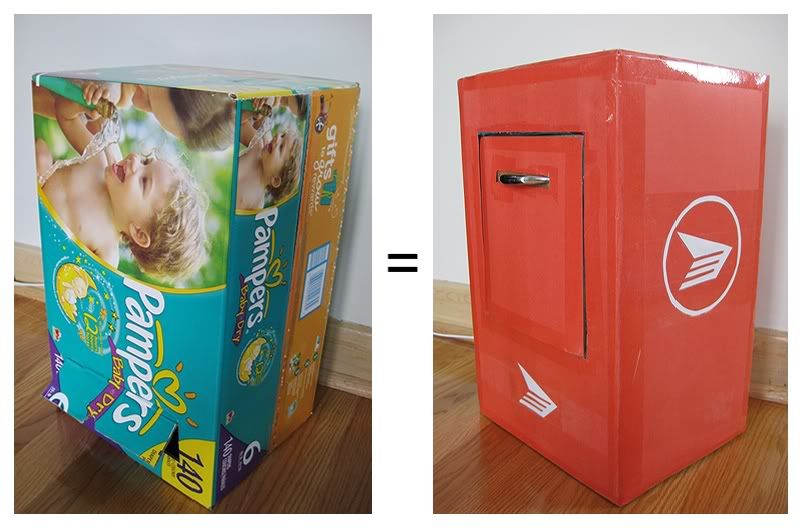
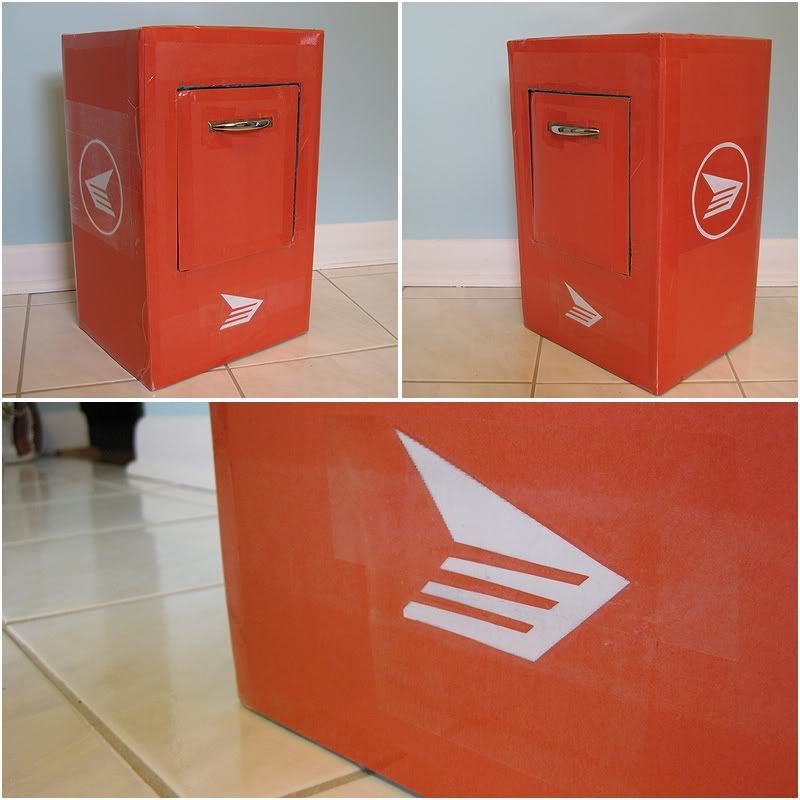
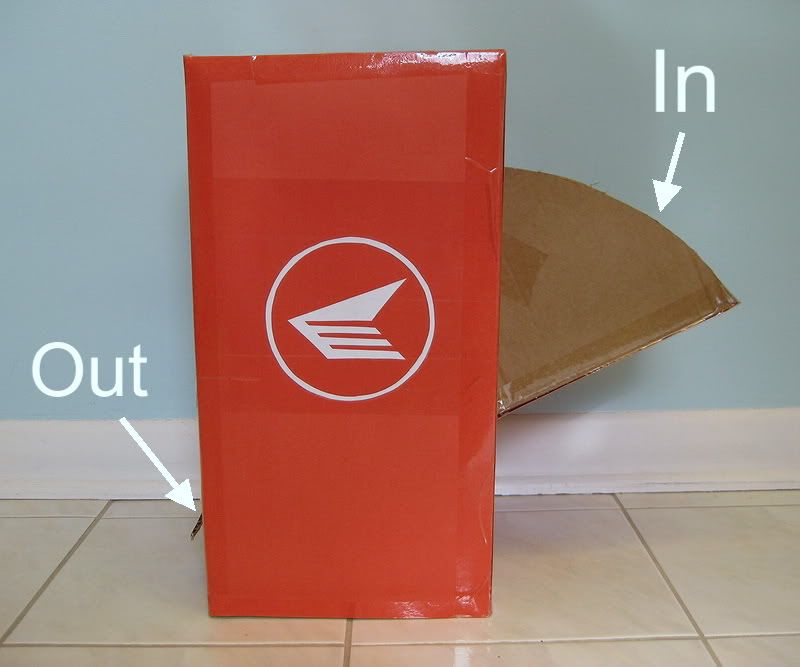
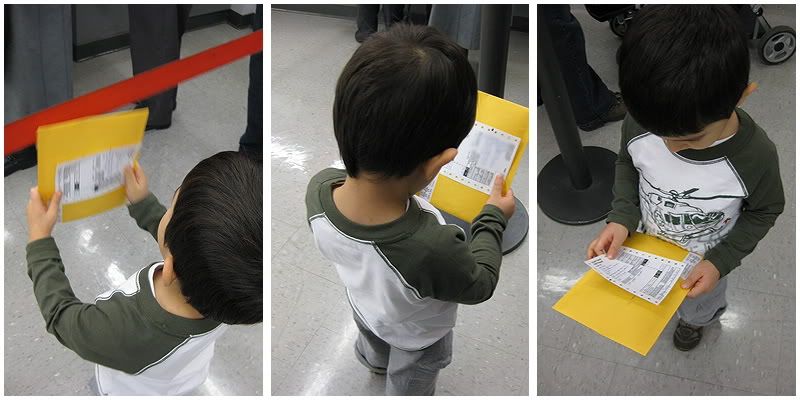
Wow... this week FLEW by...  I can't believe we're already at the weekend and I haven't written a post since Monday.   Normally I try to write a post when the kiddies are napping but this week, I napped with Joshie instead.   Although he's super hyper most of the day, he's always very quiet when it's time for Baby Bunny to take a nap.  Then, we get some quiet one on one time to do a puzzle, we read in bed for about half an hour, and then we snooze together.  It's true what they say about sleeping kids... they always look like babies when their eyes are closed and they are snuggled up next to you.  Most times, I usually fall asleep before he does, but I always wake up first.  I always hope for at least 5 minutes of sleep-watching before I have to go get Bunny.

I'm trying to capture all of those "pre-school" moments as in 6 short months, my baby will be heading off to school.  So my goal is to make sure that we have as much fun between now and then.

We went to the Toronto Zoo on Wednesday and the kids had a blast.  I was exhausted - all that fresh air makes me sleepy.  Kids have no idea how lucky they are... they get to sleep on the way home, while I have to keep my lids peeled open.


We checked out some different areas this time but made sure we saw their favourites:  the penguins, gorillas, and the lions.
 

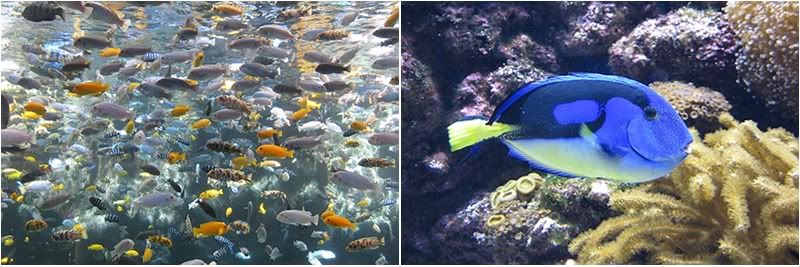
Can't forget the fishies!


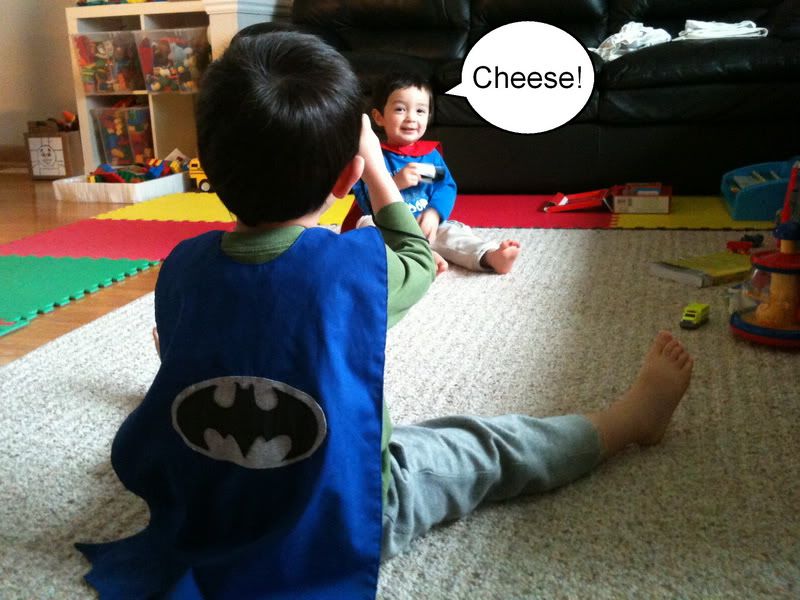
I love this chair.  So did the kids.  Joshie tried to take a nap on it.  Then Bunny tried too.  Jokers!

 
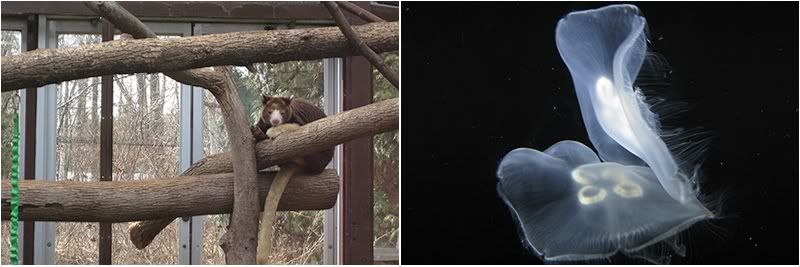
We forgot to see the baby polar bear but we saw them last time so they didn't miss them.  We did get to see some kangaroos at Joshie's request along with some jelly fish.  Very cool!


Hmm... this post wasn't supposed to be about the Zoo...   Regardless of how one feels about the zoo, it's a great learning place for kids.  It's one thing to learn by watching a video on the internet and it's another to see these animals with your own two eyes.

Next week is March Break.  This pretty much means that everything will be very busy in the city so maybe I will have time to do some crafting and sewing?   I hope so!

Enjoy the start of March Break!  I'm off to bed so I can muster up the energy to drive Joshie to his last Little Farmer's Class at the Riverdale Farm.  I think we are learning about sheep...