There is such a thing as too many cookies. I am done... for now.
Here's what I baked this past December: sugar cookies, gingerbread, chocolate chip, and almond paste cookies.
Then I layered them in jars to give out.
I also tried meringues for the first time. The kids loved it but I'm not really a fan. Maybe I'll try it again but use some chocolate chips for different texture.
Then went overboard trying to make the perfect whipped butter cookie. Am still trying... then I moved onto chocolate meringues, polenta cookies, and more gingies.
It's not Christmas if I don't make big fat gingies. Just like last year... Although this year, I tried some hair for the girl gingie. It didn't go over too well.
I made walnut cookies for my mom
We don't do food treats at the new school. Maybe that's a blessing in disguise, remember these cookies I made for Valentine's last year? Would have been easier to buy stickers...
We did give treats to Joshie's teacher along with a special card. His friends got stickers, a pencil, and a stamp.
Somewhere along the way, we made some ornaments. We also made some with clear glass balls but forgot to take a pic.
Then the ice-storm hit and we lost power just as these almond cookies went into the oven. I forgot them in there and 2 days later, retrieved these sad looking cookies.
As I write this post, I'm eating a polenta cookie. Due to the ice storm, the cookies are staying here in our house and I will probably bake again when hubby's family reschedules our Christmas Eve dinner.
Hope you're all enjoying your own Christmas traditions!
Friday, December 27, 2013
Wednesday, December 25, 2013
Merry Christmas!
Sunday, December 22, 2013
Tutorial: DIY 4x6 Envelope for Mailing Photos
This year we saw Santa in November, had the photo taken, high-fived each other for being early, and did nothing with the picture. So here we are with less than 3 days before Christmas with some photos and no envelopes. After visiting Walmart and Staples on Friday, I was chagrined to find out that neither store sold 4 x 6 photo envelopes. Grrr....
Yesterday, we had extremely icy roads due to freezing rain plus a very sick little boy. So, I wasn't able to go out. Here's a pic of the road outside. The weight of the ice broke many pieces off of our Japanese Maple tree and completely changed the shape of our birch tree.
So long story short, this post is all about making your own envelope to hold a 4x6 photo.
Thank goodness for the internet. I found a printable PDF from minieco (size C6) and decided to make my own envelopes using stock card paper. However, I didn't want to have to write out the labels so I decided to print them on the cardstock along with the envelope template.
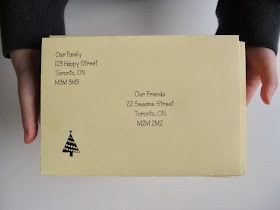
Minieco's website only allows you to print the pdf. If you want to modify it, you'll have to do a bit of work. First, download the template and save as a .tiff file. Then open a word document and insert the .tiff file into the document. Size it appropriately and print a sample to test it out. Once you know it's good, insert a text box for both addresses. I also included a little pic of a Christmas tree. When it's perfect, type in your addresses and print away!
Note: after I printed my cards, I realized I could've typed a message on the flap too.
Here's what it looked like once I printed it.
Once the ink is dry, cut out your template. Then score the lines using the back of your scissors to make it easier to fold the envelope. Glue the flaps with a glue stick. Insert the picture and glue or tape the envelope shut.
Then run to the mailbox as fast as you can in hopes that it'll get to family and friends in time.
This is not the DIY that I anticipated doing but it turned out well. Sorry friends for being so tardy with our Christmas cards this year (and every year prior to this year and probably every year after).
How many more days til Christmas???
Saturday, November 30, 2013
Tutorial: DIY Pom Pom Advent Calendar
This year we tried to buy an advent calendar but couldn't find a nice wooden one. Then I saw this one online at Target and was ready to buy it.
But it sold out quickly.
Then I saw this one online at Sears but it too was sold out.
We could've done chocolate filled calendars but I wanted the option to choose what went into the calendar. I thought about doing a banner like my birthday banner (with pockets) but wasn't able to sew anything because I had laser eye surgery 3 weeks ago and recovery has been slow.
So while my eyes were resting from the surgery, I had a lot of time to think about what to make. It had to be simple, fast, and use materials that I already had in my home. Then it hit me... a pom pom advent garland!
Here's what you need:
Yarn
Needle
Pom pom maker or piece of cardboard to wrap the yarn around
Clothespins
Paper
I actually made the pom poms with my eyes closed. I wrapped my yarn around the pom pom maker 70 times, had the kids cut the yarn for me, and eventually ended up with 25 pom poms.
Next, I made my envelopes because I couldn't find tiny envelopes anywhere. I went to dafont.com and used a holiday font for the numbers and trees. I printed out 24 templates and started cutting.
Now you're ready to put it together! Estimate how much yarn you'll need for the garland. Thread the needle and then pass the needle through the thickest part of the pom pom. Then thread it through the clothespin. Repeat and make sure you space them apart.
Test it out and see what it looks like with your envelopes.
I threaded the rest without attaching the envelopes.
And here's the whole thing
As we take down envelopes, we can start putting up Christmas cards or use it to hang small art projects.
Tomorrow is Dec 1... we have until tomorrow morning to figure out what's going in those little envelopes. Joshie thinks I should put a Pokemon card in each one... what would you put inside?
Thursday, November 07, 2013
Tan Train Toddler Backpack
Chugga chugga choo choo! I made this Toddler Backpack for C's son. She wanted a tan and grey combination.
I made sure that I also used a grey label to keep with the theme.
We did a pocket on one side and an initial on the other.
The bottom is quilted
Here's the back
and the top
In good company
Waiting to be shipped... can't wait to see some pics of the little one with his backpack! His Mom is a photographer in Pennsylvania. Here's a link to her FB page Little Daisy Photography.
Updated: Jan 7, 2014. How awesome is this photo?
Credit: Little Daisy Photography |
Until next time!
Wednesday, October 30, 2013
DIY Knight Costume - Part 2
Last year, I made Joshie a templar knight costume. It was a little too big last year but it fits perfectly now. He agreed to wear it again since none of the kids at his new school have seen it yet. I was starting to get worried that I'd be making something last minute.
We put on his costume and practiced trick-or-treating over on main street. It was cold and so most of his costume was hidden under a bulky jacket and gloves. Then I realized, he needs a cape/cloak!!!
So I made him a cape which took no more than 30 min and we are now set. Maybe it'll rain again this year, or maybe it'll snow. Either way, he'll look like he's wearing a costume.
Here's a side by side. I used some old fabric that I had in my stash that was originally intended for me.
My model was at school so the mannequin had to stand in.
Here's how I did it.
First I folded my fabric in half. If I made the cape shorter, then I would have cut it out (like in pic 1) and continued on. However, my fabric wasn't long enough so I had to join some more fabric to complete the arc (pic 2)
This is what the joined fabric looked like.
After I cut out the arcs, the rest was just finishing touches.
I did a rolled hem with my serger around the entire cape (except for the neckline).
Then I used some bias tape to bind up the neckline
Easy peasy! Maybe I need one too...